Genealogical research is a complex, ongoing pursuit that significantly benefits from the exploration of various sources, among which funeral records play a crucial role. These records, encompassing burial details, obituaries, funeral home data, and even digital tributes, offer profound insights into an individual’s life and societal context, essential for building a comprehensive family history. Particularly for beginners, these records act as a vital link to past generations, confirming crucial dates and uncovering familial connections and personal details that might otherwise remain unknown. This guide aims to introduce genealogists to the rich potential of funeral records, empowering them to use these tools to deepen their understanding of their ancestry.
Genealogical research involves the practice of piecing together the lives and relationships of our ancestors. It requires the use of varied sources to construct accurate and comprehensive family histories. Among these sources, funeral records stand out as particularly valuable, yet some types are often underutilized.
Funeral records encompass a range of documents created in response to a person’s death. These include burial records, obituaries, funeral home records, and even eulogies or digital memorials. Each type of record can reveal unique details about the deceased’s life, family, and societal context, making them indispensable for filling gaps in family trees and adding depth to our understanding of ancestors’ lives.
For genealogists, especially those just beginning their research journey, funeral records offer a direct link to past generations. They not only confirm dates and places of death but often provide critical connections to other family members, unveil personal details that are not recorded elsewhere, and offer insights into the social and cultural aspects of the time. This introduction to funeral records will guide new researchers on how to access and use these records effectively to enrich their genealogical explorations.
Types of Funeral Records
Funeral records are an umbrella term for various documents associated with an individual’s death. Understanding each type can help genealogists uncover different facets of their ancestors’ lives. Here are the main categories:
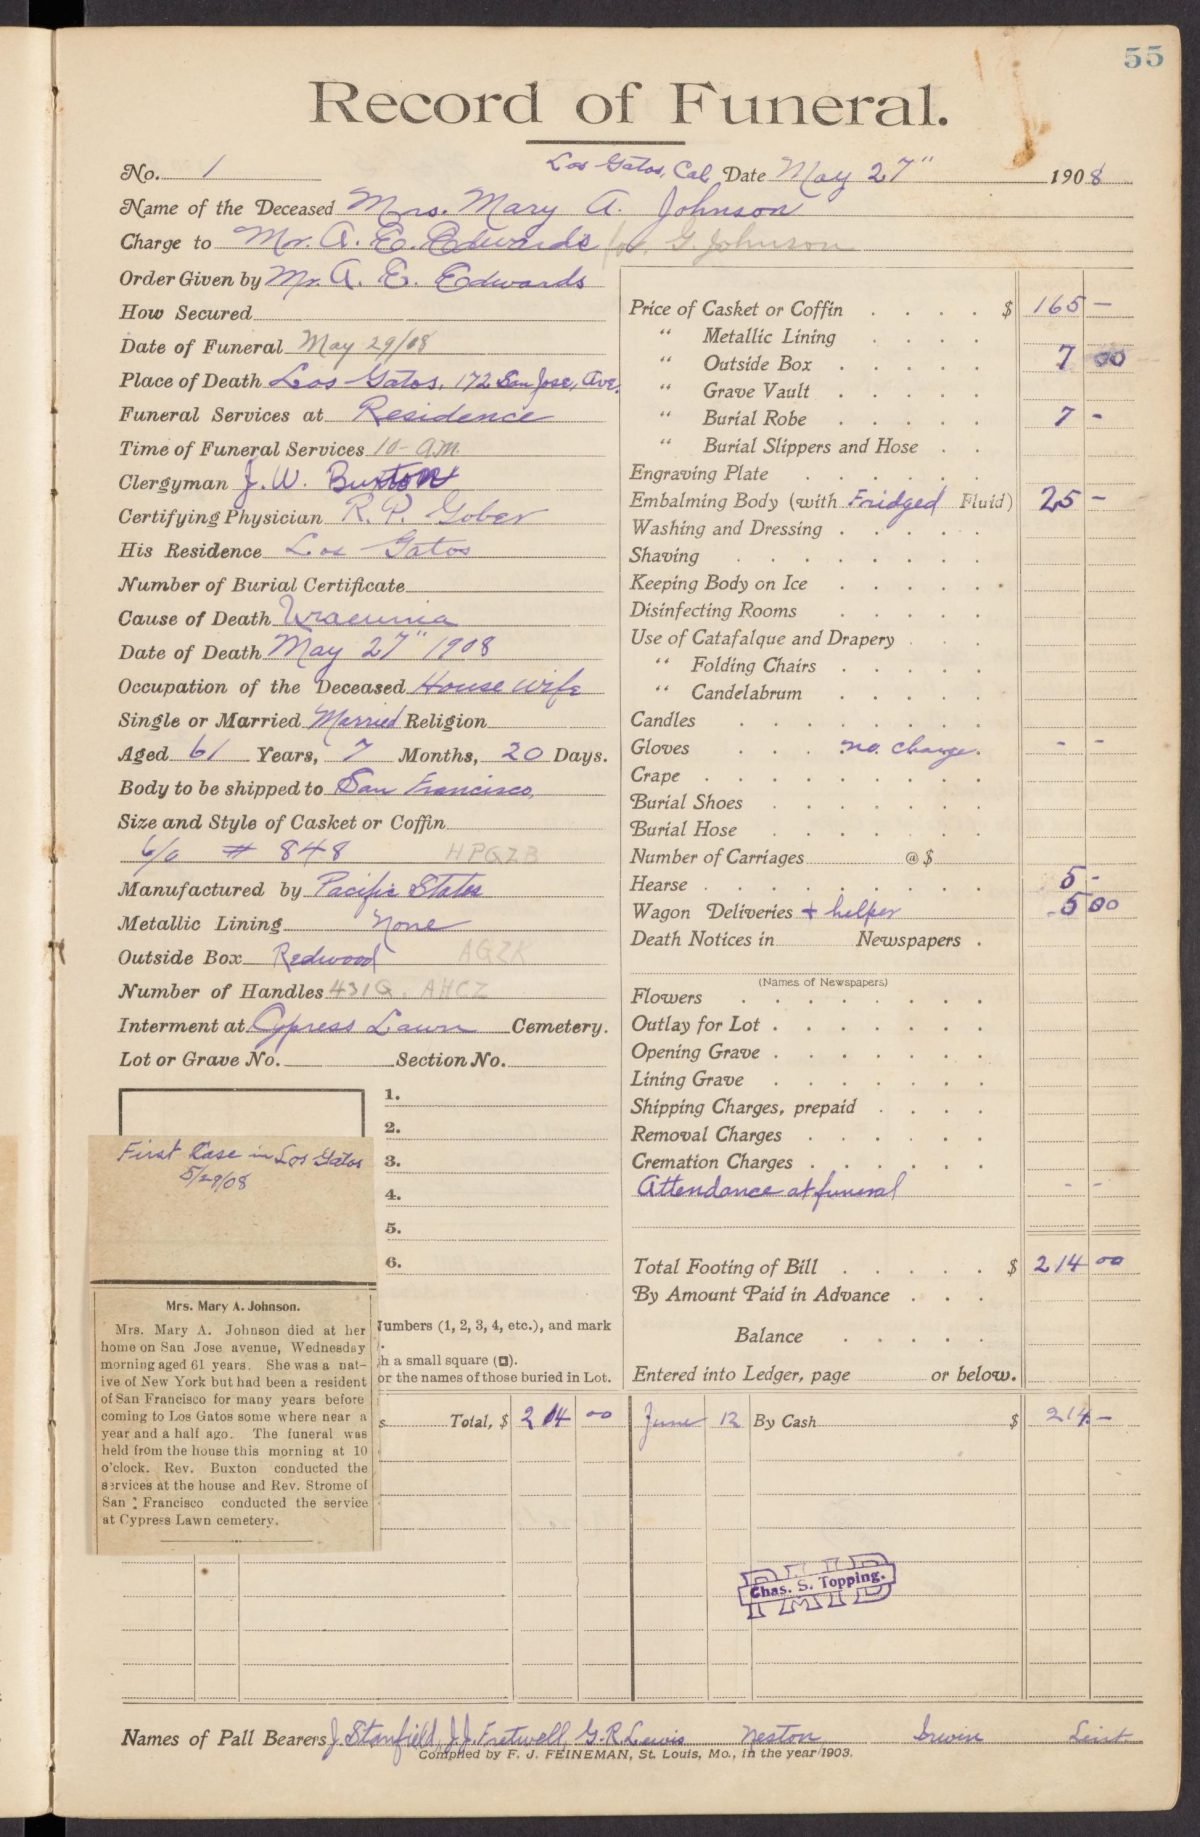
- Funeral Home Records: These records are kept by funeral homes and may include details such as the deceased’s name, age, date of death, cause of death, and information about the funeral service. They might also contain personal notes about the deceased, including their occupation, religion, and residence.
- Burial Records: Often maintained by cemeteries, these records can provide the location of the grave within the cemetery, the date of burial, and sometimes the names of other family members buried nearby. This is particularly useful for identifying relationships and locating family plots.
- Obituaries: Published in newspapers, obituaries are a rich source of information. They typically include the date of death, a brief biography, and the names of surviving family members. Obituaries can be especially valuable for identifying relatives and outlining the deceased’s community involvement or significant achievements.
- Eulogies: While not always formally recorded, written or recorded eulogies given during funeral services can offer personal insights into the life and character of the deceased. If available, these can provide anecdotal evidence and personal stories that are not captured in official records.
- Digital Memorials: In the modern digital age, online memorials and social media tributes have become increasingly common. These platforms may offer a contemporary perspective on the deceased’s life, including photographs, personal anecdotes, and tributes from friends and family.
Historical Context and Evolution of Record-Keeping Practices
The practice of keeping funeral records has evolved significantly over time. In the past, record-keeping was often informal and sporadic, conducted by religious institutions or local municipalities. Early records might only include minimal information, such as the name and date of death. As bureaucratic processes developed and population management became more systematic, the detail and reliability of records improved.
In the 19th and 20th centuries, as governments instituted more formal requirements for death documentation, funeral records became more standardized and comprehensive. This evolution reflects broader societal changes, including advances in public health, urbanization, and the professionalization of the funeral industry.
For genealogists, understanding the type of record and its historical context is crucial. It not only affects the kind of information available but also influences how that information should be interpreted. Each record type, from traditional burial records to modern digital memorials, offers unique insights that, when combined, can create a fuller picture of an ancestor’s life and the times they lived in.
Accessing Funeral Records
Locating and accessing funeral records can be a crucial step in genealogical research. Here’s how and where you can find these records:
- Online Databases: Many websites specialize in historical and genealogical records, including funeral records. Platforms like Ancestry.com, FindAGrave.com, and FamilySearch.org offer extensive collections of digital records, which can be searched from the comfort of your home. These databases often have indexes that include obituaries, burial records, and other death-related documents.
- Local Libraries: Libraries often have historical archives that include local newspapers, some of which may not be digitized. Obituaries and funeral notices can be found by browsing newspaper archives from the relevant period. Libraries may also hold other regional genealogical resources or have subscriptions to online genealogical databases.
- Church Archives: Many churches keep records of the funerals they conduct, especially if the deceased was a member of the congregation. These records can include burial records and other documents not available in public or government archives.
- Funeral Homes: If you know which funeral home handled the arrangements, contacting them directly can be fruitful. They may hold records such as funeral home records, guest books, and funeral service programs. However, access might be restricted due to privacy laws or internal policies.
- Government Archives: Local, state, or national archives often hold vital records, including death certificates and burial permits. These can provide official information about the deceased’s death and burial details.
Tips for Requesting Records and Understanding Access Restrictions
- Formal Requests: When requesting records from institutions like churches or funeral homes, a formal letter or email detailing your request can be helpful. Clearly state your relationship to the deceased and your reason for requesting the records. Include any known details (e.g., full name, date of death) to facilitate the search.
- Handling Restrictions: Be aware that access to certain records may be restricted to protect the privacy of individuals and families. For instance, recent records may not be publicly accessible or may require proof of familial relationship for access.
- Be Prepared for Fees: Some archives and databases require a fee for access or for making copies of records. Always inquire about any potential costs beforehand.
- Utilize Freedom of Information Laws: In some regions, freedom of information laws allow you access to certain types of records. Understanding these laws can help you access necessary documents.
- Persistence Pays Off: Sometimes, initial attempts to find records may not be successful. Persistence, revisiting sources, or expanding your search to alternate locations or databases can often yield results.
By understanding where to look for funeral records and how to access them, genealogists can significantly enhance their research, gaining deeper insights into their ancestors’ lives and the contexts in which they lived.
Information Found in Funeral Records
Funeral records can provide a wealth of information that is invaluable for genealogical research. Below is a list of common types of information these records may include:
- Full Name and Aliases: Provides the full legal name of the deceased and any aliases or nicknames, which is crucial for verifying identities in other records.
- Birth and Death Dates: Essential for creating accurate timelines and distinguishing between individuals with the same name.
- Family Members: Lists immediate and sometimes extended family members, which helps in constructing family trees and identifying relationships.
- Cause of Death: Can offer insights into genetic health issues or historical health trends within a family or community.
- Occupation: Gives a glimpse into the social status and economic conditions of the deceased’s life, which can be further explored in occupational records or business directories.
- Religious Affiliations: Indicates the deceased’s religious community, which can lead to additional records from religious institutions.
- Last Residence: Helpful in tracking geographical movements and locating property records or city directories.
- Funeral Service Details: May include the location and officiant of the funeral, which can provide leads to church records and community involvement.
Examples Showing the Value of Funeral Records
Example 1: Tracing Family Connections Through Obituaries
- A researcher found an obituary that listed the deceased’s surviving relatives, including a previously unknown sibling. This discovery allowed the researcher to expand the family tree and connect with living relatives, who provided additional family history and photographs.
Example 2: Occupational Insight Leads to Business Records
- From a funeral home record, a genealogist learned that their ancestor was a shop owner. This information led to the discovery of business records and advertisements in old newspapers, which revealed more about the ancestor’s life and community involvement.
Example 3: Religious Affiliation Unlocks Church Archives
- The mention of a religious affiliation in a funeral record prompted a search in church archives, where baptism, marriage, and other family records were found. This not only confirmed dates and relationships but also provided a deeper understanding of the family’s religious and social life.
These examples illustrate how details from funeral records can act as springboards for further research, leading to richer and more comprehensive family histories. Whether confirming family connections, uncovering professional lives, or revealing community ties, the information gleaned from funeral records is often foundational to building a detailed genealogical profile.
Analyzing Funeral Records
Effectively using funeral records in genealogical research requires careful analysis and verification of the information they contain. Here are some strategies to ensure the accuracy of the data and integrate it with other genealogical resources.
Verifying the Accuracy of Information
- Cross-Check with Multiple Sources: Confirm details found in funeral records with other independent sources such as census records, birth certificates, and marriage licenses. Consistency across various documents increases the reliability of the information.
- Consider the Source: Evaluate the reliability of the record itself. Records created closer to the date of the event (e.g., death certificates issued shortly after death) are likely to be more accurate than those created later (e.g., memories shared in eulogies).
- Look for Anomalies: If certain information seems out of place (such as an unlikely cause of death for a certain age), investigate further by consulting medical records or contemporary health reports.
- Consult Experts or Forums: When in doubt, seek advice from more experienced genealogists or relevant online forums. Other researchers may offer insights or suggest resources for verifying challenging details.
Techniques for Cross-Referencing Funeral Records
- Use Consistent Identifiers: When cross-referencing, focus on consistent identifiers like full names, birth dates, and locations. These details help ensure you are tracing the correct individual across different records.
- Integrate with Census Data: Census records provide household compositions, ages, and birthplaces which can confirm or clarify details from funeral records. For instance, if a funeral record lists a family member not present in prior census data, it might suggest additional avenues of research such as births or marriages that occurred between census years.
- Link to Vital Records: Birth and death certificates provide official confirmation of the dates and places listed in funeral records. Matching these can confirm identities and relationships outlined in obituaries and funeral home records.
- Map Family Relationships: Use information from funeral records to construct family trees, and then verify these relationships through other records like wills, probate records, and land deeds. This can also help in understanding family dynamics and inheritance patterns.
- Timeline Analysis: Create timelines using information from funeral records alongside other documents. This can reveal inconsistencies in recorded dates or uncover events that may have influenced the family, such as migrations or economic changes.
By carefully verifying the accuracy of funeral records and skillfully integrating them with other genealogical data, researchers can create a more complete and accurate family history. This process not only deepens understanding of ancestors’ lives but also strengthens the overall genealogical research by building a robust evidential foundation.
Challenges and Limitations
Using funeral records in genealogical research can be highly rewarding, but researchers often encounter specific challenges. Understanding these issues and how to address them can greatly enhance the research process.
Common Challenges
- Incomplete Records: Many funeral records, especially older ones, may be incomplete. Key information such as birthplace, names of parents, or even accurate dates might be missing.
- Transcription Errors: As records are transcribed from original documents into digital databases, errors can occur. Names might be misspelled, dates may be incorrect, or entire entries could be omitted due to illegible handwriting.
- Access Limitations: Some records may be restricted due to privacy laws, especially records that are not very old. Additionally, physical records may be housed in locations that are not easily accessible to all researchers, such as private archives or overseas institutions.
Strategies to Overcome These Challenges
- Consult Multiple Sources: To compensate for incomplete records, seek out additional sources that might provide the missing information. For example, if a funeral record lacks a birth date, look for a birth certificate or baptism record in civil or church registers.
- Verify Transcriptions: Whenever possible, view images of the original records to verify the accuracy of transcribed data. This can help identify transcription errors and provide a more accurate understanding of the information.
- Utilize Alternative Records: If access to certain funeral records is restricted, look for alternative sources that might contain similar information. For example, cemetery records, wills, and probate records can offer insights into death dates and family relationships.
- Leverage Technology: Use online forums, genealogical societies, or social media groups to seek help from other researchers who might have access to the records you need or who can offer advice on handling access restrictions.
- Plan Research Visits: If essential records are located in archives that require in-person visits, plan a research trip. Many archives offer specific days or hours for public access, and some even provide assistance from archivists or volunteers.
- Legal and Ethical Considerations: Understand and respect the legal and ethical considerations surrounding access to personal records. This may involve adhering to specific protocols for requesting sensitive information or ensuring that the use of such information respects the privacy of individuals and their families.
By adopting these strategies, genealogists can effectively navigate the challenges associated with using funeral records and enhance the quality and depth of their genealogical research. This proactive approach ensures that even with inherent limitations, funeral records remain a vital resource in uncovering family histories.
Conclusion
Funeral records are an invaluable resource in genealogical research, offering a wealth of information that often cannot be found in other types of records. They provide key details about an individual’s life and death, such as names, familial relationships, occupational data, and even social affiliations, which can significantly enrich a family history project. These records not only solidify dates and facts but also bring personal stories and community contexts into sharper focus, adding depth and texture to the narratives of our ancestors’ lives.
Despite some challenges such as incomplete details, transcription errors, and access restrictions, the benefits of incorporating funeral records into genealogical research are undeniable. By using the strategies outlined to overcome these obstacles—such as verifying information across multiple sources, seeking original documents, and exploring alternative data—you can greatly enhance the reliability and scope of your research findings.
As you delve into your family history, consider the diverse and rich data that funeral records offer. Integrating these records into your research projects can provide breakthroughs and insights that are not possible through other sources alone. Whether you are a beginner or an experienced researcher, the pursuit of these records can open new avenues of discovery, helping to piece together the complex puzzle of your heritage. Therefore, make funeral records an integral part of your genealogical research toolkit and explore the past with a more informed and comprehensive approach.