From Chaos to Clarity: The Art of Identification

With your genealogy materials sorted and categorized, the next crucial step is to label and date each document and record. Proper labeling and dating not only make it easier to find and understand the information in the future, but also ensure that your family history remains organized and accessible. In this article, we’ll guide you through the process of effectively labeling and dating your genealogy materials, helping you create a clear and navigable archive of your family’s past.

Labeling and Dating Your Genealogy Materials for Enhanced Accessibility

With your genealogy materials sorted and categorized, the next crucial step is to label and date each document and record. Proper labeling and dating not only make it easier to find and understand the information in the future, but also ensure that your family history remains organized and accessible. In this article, we’ll guide you through the process of effectively labeling and dating your genealogy materials, helping you create a clear and navigable archive of your family’s past.

Choose the right tools:
To preserve the integrity of your documents, it’s essential to use archival-safe pens or pencils when labeling and dating. These writing tools are specifically designed to minimize damage to delicate documents over time. Avoid using regular ink pens, highlighters, or adhesive labels, as these can cause irreversible damage.

Develop a consistent labeling system:
Create a uniform labeling system to ensure that your labels are clear, concise, and easily understood. Establish a standard format for recording names, dates, and relationships on your documents and records. Consistency is key, as it allows for easy navigation and interpretation of your materials.

Example labeling format:

Full Name (Surname, Given Name)
Date (YYYY-MM-DD)
Relationship (e.g., Father, Mother, Spouse, Child)

Identify key information:
Examine each document and record to pinpoint the essential names, dates, and relationships associated with the information. If this information is not readily apparent, use your genealogy research skills and other resources to fill in any gaps.

Label documents and records:
Label each document and record clearly and legibly, adhering to your established labeling system. Write the information in an area that does not obscure any critical details, such as the margins or on the back of the document. Be gentle when writing to avoid causing damage.

Date your documents:
In addition to labeling names and relationships, ensure that each document or record is dated. This may include the date the document was created, an event date (such as a birth or marriage), or both. Use a consistent date format, such as the international standard YYYY-MM-DD, to avoid confusion.

Label containers and subfolders:
In alignment with your overall organizational system, label the folders, binders, or other containers that house your documents and records. This will make it easier to locate and access specific materials in the future.

Refer to your previously created reference guide:
As you label and date your documents and records, refer to the reference guide you created in the earlier stage of organizing your genealogy materials. This guide will help ensure consistency throughout your genealogy project, as it contains examples of the proper format for names, dates, and relationships, as well as any other pertinent information.

Periodically review and update:
As your genealogy research progresses, you may discover new information or identify errors in your labels and dates. Periodically review and update your materials to ensure accuracy and consistency, making any necessary corrections or additions.

Effectively labeling and dating your genealogy materials is essential for maintaining a well-organized and accessible family history archive. By developing a consistent system and diligently identifying and recording key information, you’ll create a valuable resource that simplifies your research and enhances your understanding of your family’s past. With your ancestral archives labeled and dated, you’ll be well-prepared to navigate and appreciate your family’s unique journey through history.

From Chaos to Clarity: Taming the Paper Trail

After assessing your genealogy materials and creating a solid plan for organization, the next step is to sort and categorize the documents and records. This process will transform your collection from a disorganized heap into a structured and accessible family history resource. In this article, we’ll outline the essential steps for effectively sorting and categorizing your genealogy materials, making it easier for you to navigate and interpret your family’s past.

Sorting and Categorizing Your Genealogy Materials for Maximum Clarity

After assessing your genealogy materials and creating a solid plan for organization, the next step is to sort and categorize the documents and records. This process will transform your collection from a disorganized heap into a structured and accessible family history resource. In this article, we’ll outline the essential steps for effectively sorting and categorizing your genealogy materials, making it easier for you to navigate and interpret your family’s past.

Prepare your workspace and materials:
Before you begin sorting and categorizing, ensure that you have a clean, well-lit, and comfortable workspace. Gather the necessary supplies, such as folders, subfolders, labels, sticky notes, and archival-quality pens or pencils. If you’re using a color-coding system, make sure you have the appropriate colored labels or tabs.

Review your organizational plan:
Refer to the organizational plan you created in the previous step. Familiarize yourself with the categories, subcategories, and labeling system you’ve established. Keep your reference guide handy for consultation during the sorting process.

Start with one folder or binder at a time:
To avoid becoming overwhelmed, focus on sorting and categorizing the contents of one folder or binder at a time. Begin by removing all the loose papers and records from the folder or binder and laying them out on your workspace.

Sort documents by category:
Using the categories and subcategories from your organizational plan, start sorting the loose papers and records into distinct groups. Be consistent with your sorting criteria, ensuring that each document or record is placed in the appropriate category.

Create subfolders for categories and subcategories:
For each category or subcategory, create a subfolder within the main surname folder. Clearly label the subfolder according to your established labeling system. If you’re using a color-coding system, apply the appropriate colored label or tab.

Place documents into subfolders:
Once you’ve sorted the materials into categories and created corresponding subfolders, place the documents and records into their respective subfolders. Make sure each item is placed in the correct folder to maintain the integrity of your organizational system.

Label individual documents as needed:
If necessary, label individual documents or records with pertinent information, such as names, dates, or relationships. Use archival-quality pens or pencils to avoid damaging the materials.

Secure and store sorted materials:
After sorting and categorizing the contents of a folder or binder, securely store the subfolders and materials. Repeat the process for each remaining folder or binder in your collection.

Review and adjust:
As you work through the sorting and categorizing process, be prepared to review and adjust your organizational plan if needed. You may encounter unexpected materials or discover new connections that require updates to your categories, subcategories, or labeling system.

Sorting and categorizing your genealogy materials is a critical step in transforming your collection into a valuable family history resource. By following your organizational plan and diligently sorting each document and record, you’ll create a clear, accessible, and meaningful archive that will enrich your understanding of your family’s past and serve as a treasure for future generations.

From Chaos to Clarity: Charting Your Family’s Journey

After assessing your genealogy materials, the next step is to create a plan for organizing them. A well-thought-out plan will make the process smoother and more efficient, enabling you to easily access and understand your family’s history. In this article, we’ll guide you through the essential elements of crafting an effective plan for organizing your genealogy materials, ensuring a successful and enjoyable project.

Crafting an Effective Plan for Organizing Genealogy Materials

After assessing your genealogy materials, the next step is to create a plan for organizing them. A well-thought-out plan will make the process smoother and more efficient, enabling you to easily access and understand your family’s history. In this article, we’ll guide you through the essential elements of crafting an effective plan for organizing your genealogy materials, ensuring a successful and enjoyable project.

Establish your organizational goals:
Determine the primary focus of your organization efforts. You may choose to organize the materials by generation, family line, or geographic location, or you may combine these approaches. Consider the themes and patterns you identified during the assessment stage, as they can help inform your decision. Your organizational goals will serve as the foundation for your entire plan.

Identify categories and subcategories:
Based on your organizational goals, identify the main categories and subcategories that you will use to sort the materials. For example, if you are organizing by generation, your main categories could be the generations themselves, while subcategories might include different types of records, such as birth certificates, marriage records, and photographs.

Develop a labeling system:
Create a consistent and intuitive labeling system for your folders, binders, and documents. Use clear and concise labels that indicate the category, subcategory, and any other relevant information, such as names or dates. Consider using color-coded labels or tabs to make it easier to visually identify different categories or family lines.

Plan for future additions:
Ensure that your organizational plan is scalable and adaptable, allowing for the incorporation of new materials as your research progresses. Design your system to accommodate updates or additions without disrupting the overall organization.

Create a reference guide:
Document your organizational plan in a reference guide, outlining your goals, categories, subcategories, and labeling system. This guide will serve as a valuable resource as you work through the organization process, ensuring consistency and clarity.

Consider digitization and software tools:
As part of your plan, explore options for digitizing your materials and using genealogy software to manage your family tree. Digital archives can help preserve your materials and make it easier to share information with family members. Many software applications, such as Family Tree Guide, Roots Magic and Gramps, offer tools to help you create and maintain digital family trees.

Set a timeline and milestones:
Establish a realistic timeline for your organization project, including milestones for completing specific tasks or categories. Break the process down into manageable steps and set deadlines to help you stay on track and maintain momentum.

Creating a comprehensive plan for organizing your genealogy materials is a crucial step in building a well-structured family history project. By establishing clear organizational goals, categories, and a labeling system, you’ll set the stage for a successful and rewarding genealogy journey. Remember to be flexible and adaptable, as your research and discoveries may necessitate adjustments to your plan along the way.

From Chaos to Clarity: Taking Stock of Your Family Treasure

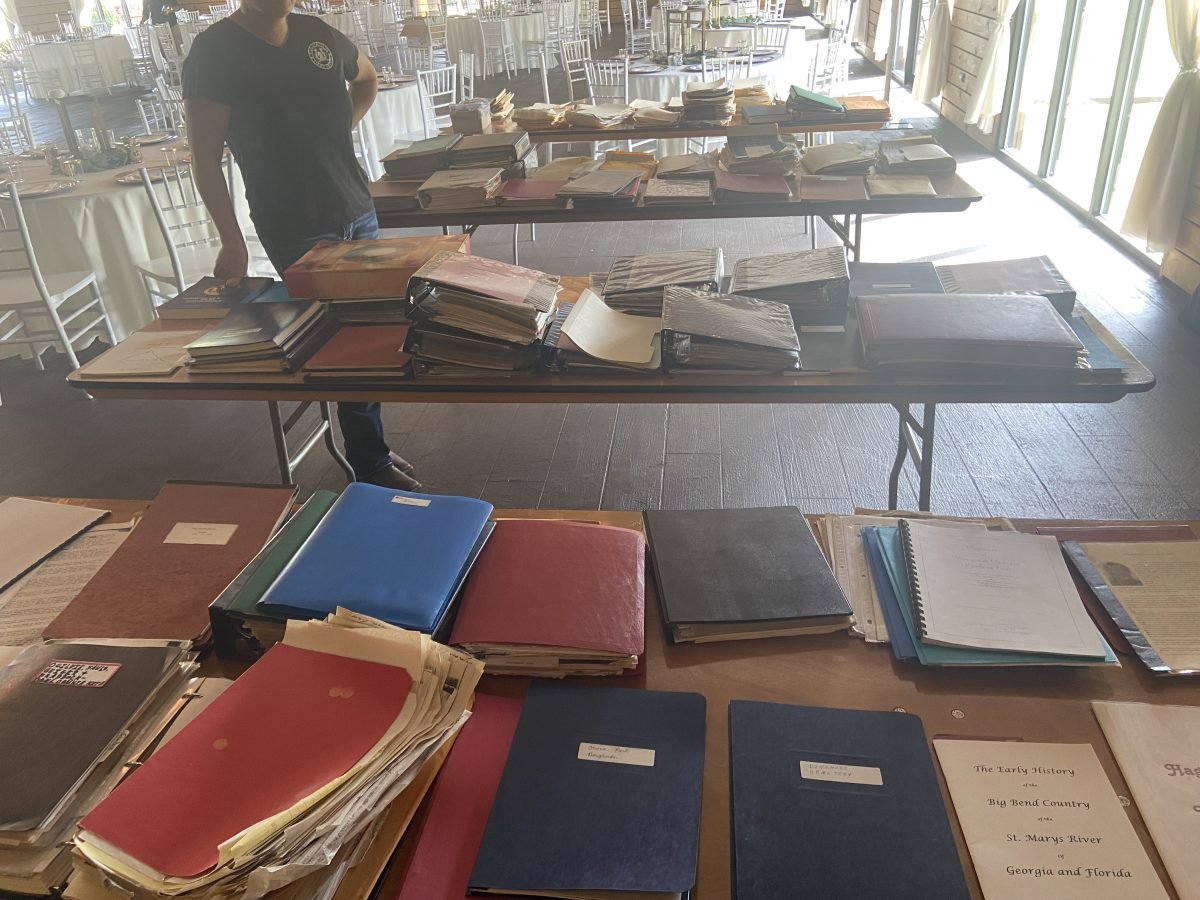
Discovering a trove of genealogy materials can be both exciting and overwhelming. Before diving into the organizational process, it’s essential to assess and understand the contents of these folders and binders. In this article, we will guide you through the crucial first step of assessing your genealogy materials, helping you establish a solid foundation for a well-organized family history project.

Assessing and Understanding Genealogy Materials

Discovering a trove of genealogy materials can be both exciting and overwhelming. Before diving into the organizational process, it’s essential to assess and understand the contents of these folders and binders. In this article, we will guide you through the crucial first step of assessing your genealogy materials, helping you establish a solid foundation for a well-organized family history project.

Prepare your workspace:
Set up a clean, clutter-free workspace with ample room to spread out the materials. Ensure that the area is well-lit, comfortable, and free from potential hazards that could damage the documents, such as direct sunlight or humidity. Gather necessary supplies, like pencils, notepads, sticky notes, and gloves to handle delicate materials.

Take an initial inventory:
Begin by opening each folder and binder and taking a high-level inventory of the materials. List the types of documents, records, and media you encounter, such as photographs, birth certificates, marriage records, census records, newspaper clippings, or letters. Note any folders or binders that contain a mix of different types of documents or records.

Identify recurring themes and patterns:
As you review the materials, look for recurring names, dates, locations, or other key pieces of information. Note any patterns or themes that emerge, such as certain surnames appearing repeatedly or a focus on a specific geographic area. These observations will help you determine the most effective organizational approach later on.

Check for existing organization:
Examine the current organization of the materials to see if there is a discernible structure or logic. Look for labels, notes, or tabs that may indicate previous attempts to categorize the information. Keep in mind that even if the existing organization seems inadequate, it may still provide valuable insights into the collection’s contents.

Create a preliminary timeline:
Using the information you’ve gathered so far, start creating a preliminary timeline or family tree. Jot down any significant dates, events, or relationships that you can glean from the materials. This will help you visualize the family’s history and identify gaps or areas that may require further research.

Note areas of interest or concern:
Flag any items that are particularly intriguing, fragile, or in need of repair. These materials may require special attention or additional research, so it’s essential to make a note of them during the assessment phase.

Document your findings:
Keep a record of your observations, either on paper or digitally, to serve as a reference throughout the organization process. Include a summary of the material’s types, recurring themes, existing organization, and any areas of interest or concern. This documentation will be invaluable as you move forward in your genealogy project.

Free Genealogy Assessment Forms

I have created two free forms for conducting an assessment on any folder, binder, or box of documents, whether donated or originally created by you.

The process of assessing your genealogy materials is a critical first step in organizing and understanding your family’s history. By taking the time to thoroughly review and document the contents of your folders and binders, you’ll establish a solid foundation for a successful and enjoyable genealogy journey.

From Chaos to Clarity

Organizing a large collection of family genealogy materials can be a rewarding task, as you’ll learn more about your family history in the process. Here are some steps to help you sort and organize the manila folders and loose papers effectively.

Unraveling Your Family’s Past with Organized Genealogy

Organizing a large collection of family genealogy materials can be a rewarding task, as you’ll learn more about your family history in the process. Here are some steps to help you sort and organize the binders, manila folders and loose papers effectively:

Assess the materials:
Start by reviewing the contents of each folder to get an overview of what you have. Look for patterns, recurring names, or other key pieces of information that can help guide your organization process.

Create a plan:
Determine your organizational goals, whether it be by generation, family line, or geographic location. You can also use a combination of these approaches. Decide on a color-coding or labeling system that will help you easily identify each category.

Sort and categorize:
Begin sorting the loose papers and records based on your chosen organization method. You may want to create subfolders within each surname folder to separate the materials into distinct categories, such as birth records, marriage records, death records, photos, letters, or other documents.

Label and date:
Label each document or record with the relevant names, dates, and relationships, if not already provided. This will make it easier to find and understand the information in the future. Use archival-safe pens or pencils for labeling to avoid damaging the documents.

Digitize:
Consider scanning or photographing important records and documents to create a digital archive. This will help preserve the information and make it easier to share with family members. Be sure to store digital files in multiple locations, such as on your computer, an external hard drive, and a cloud-based storage service.

Create a family tree:
Use the information you’ve gathered to create a visual family tree. Many online resources and software applications are available to help you design and maintain a digital family tree, such as Family Tree Maker, Roots Magic, or Gramps.

Store materials properly:
Ensure that your physical records are stored in a safe and secure location. Use acid-free, archival-quality materials to protect your documents from damage. Store your folders in a cool, dry, and dark place to prevent deterioration.

Update and maintain:
As you continue to research your family history, keep your folders and digital archives up to date with new information. Encourage family members to contribute and share their own records or stories.

Remember, organizing a family genealogy collection takes time and effort. Be patient and enjoy the journey of discovering your family’s history.

10 Ways Burial Transit Records Can Enhance Your Genealogy Research

Burial transit records provide a wealth of information for genealogists looking to discover information on their ancestor’s death and burial. By understanding the information found on these records, genealogists can gain valuable insights into the lives of their ancestors.

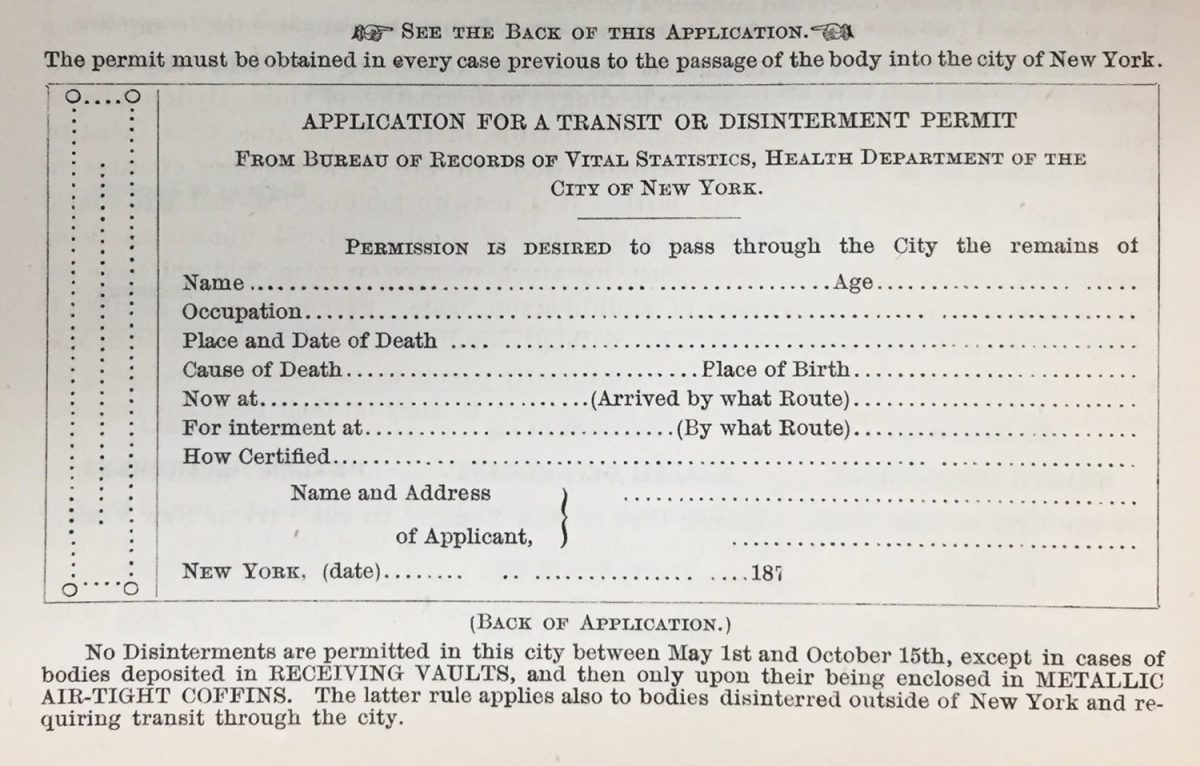
Burial transit records provide valuable information for genealogists looking to trace their family history. These records document the transportation of a deceased individual’s remains from the place of death to the place of burial. In New York City, for example, burial transit records are available from 1846 to 1948 and can be obtained from the New York City Municipal Archives.

Burial transit records were created by health departments as a means of monitoring the movement of deceased individuals and ensuring that proper burial procedures were followed. In the late 19th and early 20th centuries, there was growing concern about the spread of disease and the potential health hazards associated with improper burial practices. To address these concerns, health departments began requiring that burial transit records be filed whenever a deceased individual was transported from the place of death to the place of burial.

By creating burial transit records, health departments could track the movement of deceased individuals and ensure that they were buried in a timely and appropriate manner. The records also provided a means of monitoring burial practices and ensuring that they complied with health regulations. For example, burial transit records might include information on the type of casket used, the condition of the body, and whether or not the body had been embalmed.

The following information can typically be found on a burial transit record:

  1. Name: The name of the deceased individual is listed on the burial transit record.
  2. Age: The age of the deceased individual is listed on the burial transit record. This should help provide an approximate date of birth.
  3. Occupation: The occupation of the deceased individual may be listed on the burial transit record. This information can be useful in understanding the economic circumstances of ancestors’ lives.
  4. Place and Date of Death: The place and date of death of the deceased individual is listed on the burial transit record. This information can be useful in tracing the movement of ancestors over time. It is important to remember that the individual may only have been visiting a location at the time of their death.
  5. Cause of Death: The cause of death of the deceased individual is listed on the burial transit record. This information can provide additional context and help in understanding possible medical issues that can be genetically inherited.
  6. Place of Birth: The place of birth of the deceased individual is listed on the burial transit record. This information can be useful in identifying
  7. By what route did body arrive: The mode of transportation used to transport the deceased individual’s remains is listed on the burial transit record. This can provide insight into the transportation infrastructure of the time period and the social and economic status of the deceased.
  8. Location of internment: The location of the deceased individual’s internment is listed on the burial transit record. This can be useful in identifying possible burial locations for other family members.
  9. By what route will body go to place of internment: The mode of transportation used to transport the deceased individual’s remains to the place of internment is listed on the burial transit record.
  10. Name and Address of applicant: The name and address of the person who applied for the burial transit record is listed on the record. This person is most often related to the deceased in some manner or part of their FAN group.

The New York City records are specifically important to genealogists, as they recorded each deceased transported on the city streets, rivers, or brought into port. Bodies were transported more frequently than descendants realize, and the distance travelled could often be 1,000s of miles. The primary route on the East Coast was through NYC.

The deceased could also have been previously interred and were being relocated to a new cemetery. These records may help when you know an ancestor died at a specific location but are unable to find their burial location at the same location.

The NYC records can also be used to identify Civil War soldiers, from both sides, whose bodies were shipped home after their casualty. For instance, if your Confederate ancestor died at Davids Island after the Battle of Gettysburg, they likely have a NYC burial transit record soon after their death, even if they were buried in NYC.

In conclusion, burial transit records provide a wealth of information for genealogists looking to discover information on their ancestor’s death and burial. By understanding the information found on these records, genealogists can gain valuable insights into the lives of their ancestors.

Exploring Family History: Challenging Assumptions and Seeking Truth

“Exploring Family History: Challenging Assumptions and Seeking Truth” is an informative article that highlights the importance of questioning assumptions when researching family history. It explains why relying solely on what is already known can lead to incomplete or inaccurate information, and provides insights into the reasons why family histories can be unreliable.

When embarking on the journey of tracing one’s family history, it is common to start by gathering information from family members and personal recollections. However, relying solely on what is already known can lead to incomplete or inaccurate information. As Albert Einstein once said, ‘The important thing is not to stop questioning. Curiosity has its own reason for existing.’ It is essential to approach family history research with an open mind and be prepared to challenge assumptions and previous knowledge. By questioning what we think we know and seeking to learn more, we can gain a deeper understanding of our family’s past and uncover hidden truths that may have otherwise remained undiscovered.

The important thing is not to stop questioning. Curiosity has its own reason for existing.

Albert Einstein

There are several reasons why the information passed down through generations may not be entirely reliable. First, memories fade over time, and details can be lost or distorted. Stories may also be embellished or altered to fit the teller’s agenda or perception of events. Second, cultural norms and societal expectations can impact what is shared and what is kept hidden. Some events may be considered shameful or taboo, leading to secrets being kept within the family. Third, historical documents and records may be incomplete, lost, or destroyed, making it challenging to verify information.

To ensure the accuracy of family history research, it is essential to verify information through multiple sources. This can include official records, such as birth and death certificates, marriage licenses, and census data. DNA testing can also provide valuable insights into family connections and ethnicity. Additionally, conducting interviews with living relatives and comparing their accounts can help identify inconsistencies and discrepancies in the information gathered.

Ultimately, the pursuit of family history is a journey of discovery that requires patience, attention to detail, and a willingness to challenge preconceived notions. By approaching the research process with an open mind and verifying information through multiple sources, one can gain a deeper understanding of their family’s past and preserve their legacy for future generations.

Additional Material on Challenging Assumptions

Using Funeral Records in Genealogical Research

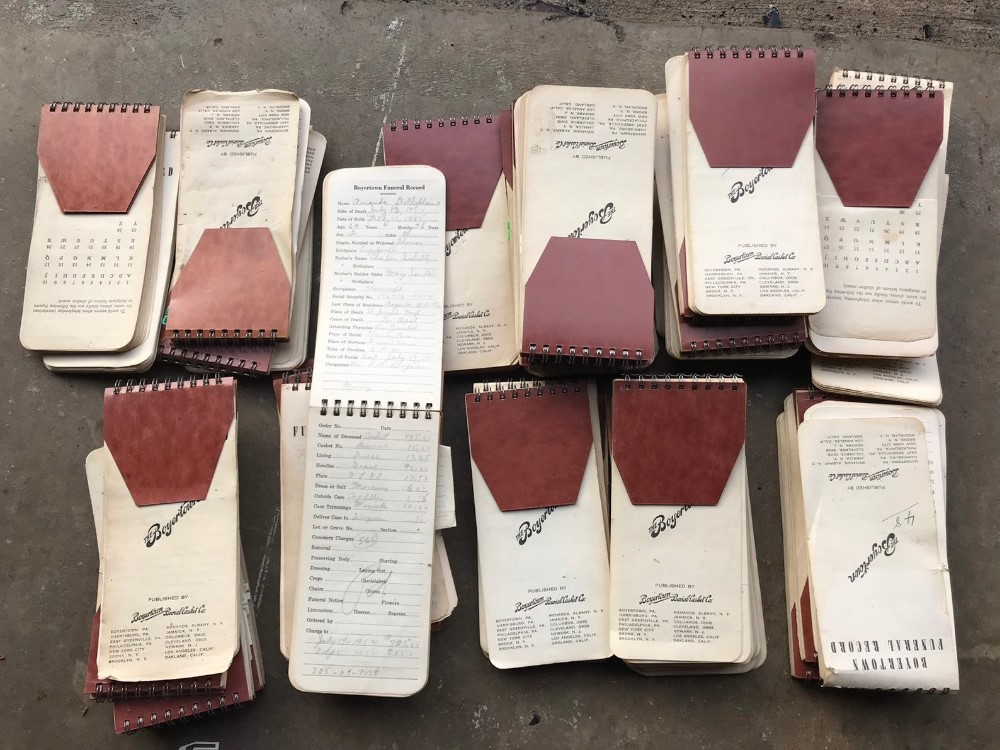
Funeral records are an excellent source of genealogical information, providing insight into the life and death of our ancestors. They often include valuable details such as the date and place of death, age, cause of death, and the name and address of the funeral home or mortuary. Funeral records also often include information on the deceased’s parents, spouse, children, and other relatives, providing an excellent resource for tracing family history. This article explores the use of funeral records in genealogy, including their benefits, how to locate them, and how to interpret the information they provide.

Benefits of Funeral Records in Genealogy

Funeral records are an excellent resource for genealogists for several reasons. Firstly, they provide a wealth of information on the deceased, including their name, age, and date of death. This information is essential for creating accurate family trees and for verifying information obtained from other sources. Funeral records also often include information on the deceased’s cause of death, which can be valuable for understanding the health and living conditions of our ancestors.

Funeral records also frequently provide information on the deceased’s family, including the names of their parents, spouse, children, and other relatives. This information can be particularly useful for tracing family relationships and for identifying previously unknown relatives. Funeral records can also provide valuable information on the deceased’s occupation, religion, and other aspects of their life, which can help genealogists to build a more complete picture of their ancestors.

Locating Funeral Records

Funeral records can be found in a variety of places, including funeral homes, mortuaries, and archives. Many funeral homes and mortuaries keep records dating back several decades or even centuries, and some may be willing to share them with genealogists upon request. Archival collections, such as those held by historical societies, may also contain funeral records, particularly for prominent or influential individuals in the community.

Obituaries and death notices in newspapers can also provide valuable information that can be used to locate funeral records. These sources often provide the name of the funeral home or mortuary handling the deceased’s arrangements, which can be used to track down their records. Online databases and genealogy websites may also contain funeral records, although these sources should be used with caution and verified against other sources to ensure their accuracy.

Interpreting Funeral Records

Interpreting funeral records can be a complex process that requires careful attention to detail and a thorough understanding of the historical context in which they were created. Genealogists must pay particular attention to the accuracy of the information provided, as funeral records can sometimes contain errors or inconsistencies. For example, the age of the deceased may be incorrect, or the names of family members may be misspelled or listed in the wrong order.

It is also important to be aware of any cultural or religious traditions that may have influenced the information contained in funeral records. For example, some religious traditions may not include the deceased’s cause of death, while others may provide extensive information on their spiritual beliefs and practices. Genealogists should also be aware of any language or terminology that may be specific to a particular time period or geographic location, as this can affect the interpretation of the information.

Conclusion

Funeral records are an invaluable source of genealogical information that can provide insight into the lives and deaths of our ancestors. They offer a wealth of details on the deceased and their family, including their names, ages, dates of death, causes of death, and other key information. While funeral records can be found in a variety of places, genealogists must be careful when interpreting the information they contain, paying close attention to accuracy and cultural context. By using funeral records in their research, genealogists can gain a deeper understanding of their ancestors and build a more complete picture of their family history.

What Information Can I Find in Passenger Lists?

Passenger lists can provide valuable information about your ancestors, including their name, age, occupation, nationality, and place of origin, as well as details about their voyage. Here are some tips for finding passenger lists for your genealogical research:

Passenger lists can provide valuable information about your ancestors, including their name, age, occupation, nationality, and place of origin, as well as details about their voyage.

Here are some tips for finding passenger lists for your genealogical research:

  1. Start with online databases: There are a variety of online databases that can help you find passenger lists, use this list. These databases allow you to search for passenger lists based on a variety of criteria, including the name of the passenger, the name of the ship, and the date of arrival.
  2. Check archives and libraries: Many archives and libraries hold historical records, including passenger lists. Some of these records may be available online, but others may require an in-person visit. If you’re not sure where to start, try searching for archives and libraries in the area where your ancestor arrived.
  3. Look for alternate sources: In some cases, passenger lists may have been lost or destroyed. In these instances, you may be able to find information about your ancestors’ arrival in other sources, such as naturalization records or census records.
  4. Use multiple sources: It’s important to use multiple sources when conducting genealogical research, as this can help you verify the accuracy of the information you find. For example, if you find your ancestor’s name on a passenger list, try cross-referencing that information with other sources, such as census records or birth certificates. You need to connect the individual(s) in the passenger list with your ancestor. Name alone usually isn’t enough.
  5. Keep detailed records: As you conduct your research, be sure to keep detailed records of the sources you consult and the information you find. This can help you keep track of your progress and avoid duplicating your efforts.

By following these tips, you can increase your chances of finding passenger lists for your genealogical research and uncovering valuable information about your ancestors. Happy sailing!

Land Deeds Research

Deeds are legal documents that provide crucial information about land ownership and transactions, dating back to the earliest days of American settlement. They are a valuable resource for genealogists, historians, and real estate professionals seeking to uncover information about specific parcels of land or to track changes in land use over time.

Deeds are legal documents that provide crucial information about land ownership and transactions, dating back to the earliest days of American settlement. They are a valuable resource for genealogists, historians, and real estate professionals seeking to uncover information about specific parcels of land or to track changes in land use over time.

Beyond providing information on ownership and transactions, deeds can reveal a wealth of historical insights. For example, they can provide details on how land values changed over time, which groups of people were able to own land, and how social and familial relationships influenced land ownership. They may also include descriptions of the land and any structures or improvements on it, such as houses, barns, or fences.

To trace the history of a piece of real estate using deeds, researchers can work backwards or forwards from one deed to the next. Each deed documents the transfer of land ownership from one individual or entity to another, creating a chain of title that can reveal important historical details. However, because counties and towns have changed over time, deeds for a single parcel of land may be located in multiple locations, requiring a thorough and methodical search to locate all relevant documents.

In addition to deeds, other historical records such as probate records and court decrees can also provide information about property transfers. These records are often located in the same place as deeds and can provide additional context for understanding the history of a particular piece of land.

Today, many registries of deeds have made their holdings available online, providing researchers with greater access to historical documents and reducing wear and tear on the original records. However, it’s important to note that not all records have been digitized, and in some cases, the only way to access a particular document may be to visit the physical location where it is held.

How do I Search for Land Deeds?

To conduct a thorough search of land deeds, follow these steps:

  1. Identify the names of the buyer (grantee) and/or seller (grantor) of the land you are researching.
  2. Determine where and how deeds are recorded and stored for the time and place of interest. You may be able to access this information online, but you may also need to visit a physical location to review the records.
  3. Check online resources for any available information.
  4. At the registry of deeds, search the grantee and grantor indexes for the names of the parties involved in the transaction.
  5. Review the body of the deed for important information such as the names of the grantor and grantee, type of covenant (warranty, quit claim, mortgage), and a detailed description of the property conveyed. Look for any additional information such as the intent of the deed, volume where the deed is recorded, price of the transaction, and chain of title.
  6. Look for a tax stamp, which can indicate the value of the transaction and can help estimate the selling price.
  7. Check for any releases of spousal rights, which can provide insight into genealogical relationships between family members.
  8. Review the acknowledgment to verify that the release was given voluntarily.
  9. Note the date and time of recording to establish chronology.
  10. Keep detailed notes or use a Deed Research form to document all the information you find, even if it doesn’t seem important at the time.
  11. Make copies of any relevant documents if necessary. Note that archives may charge for making copies.
  12. Consult other sources such as tax maps, aerial photos, insurance maps, town atlases, historical wall maps, letters, wills, and court records to verify or fill in any missing information.